Saturday, April 28, 2012

Craft Therapy: I NEED a Garage Sale

So, I said I was going to blog. I said I was going to make something beautiful EVERY day. I said this I said that. Yadda Yadda. I have kind of figured out that this artful crafting thing ebbs and flows. I have people tell me all the time, "I wish I could be creative like you." No really, I hear it almost every time I post a new project or recipe, and my overly self critical brain almost always says (inwardly) "be careful what you wish for!"

Do not get me wrong, I am thankful for my God given gifts. I would be heartbroken if I woke and they were gone. Honest. BUT, we were all given certain gifts for a reason. I think much of the time, my "creativity" (I've told you how I feel about that word) depends on my external situation. My feelings influence what I am able to accomplish. It's almost like a log jam sometimes. I've also told you I'm not a hoarder, but in a way, I think I truly am. Not with stuff, but emotionally. I hoard these emotions, and they stop the process. Today I'm going to blog about that, and show you the artistic process that results. Not really a project, but hey, you get a look inside my world and you get to see what you're asking for when you wish you "had my talent." :O) This isn't a bitter post, just a sharing post.

Let's go with why this is starting. Today, I miss my brother. Remember when I tell you this is sort of a log jam of emotions. I'm like Shrek the Ogre and there are many layers to this onion. Most people consider it a superficial thing and they only see the first layer when I yell or make a bad face about something. They don't get to that sweet layer on the inside of the onion. Oh and at this point I've got an idea for a couple of projects, but I don't really know where to start, so I go look at my craft supplies, but really don't accomplish much because mostly I'm just looking, my heart isn't in it.

 I'm looking, but nothing is happening. So I walk away, rather, I walk in a circle. About ten times. Like a dog sniffing the air before lying down so I can smell trouble coming. Yeah that's it. OH GREAT. There's something I'm going to have to work through. DADGUMMIT! I wanted to CRAFT! Well, maybe I can work around it. I circle again, and come back to the closet and get out a few supplies so I can do what Mr. Possum calls an EASY VICTORY. He seems to think that will help with what's gumming up the works and get me on to my next great thing. If I get a small win by finishing an easy project, then I will get my motivation back. Hey sometimes it works.

This time: Not so much. There you see FOUR projects not completed. I started to sew some tiny paper notebooks for a journaling project. My sewing machine oil dried out while on hiatus for a year. Thank you, again,  arid Alaska. I stopped and took it all apart, so yes that was a small victory. I didn't take pictures of that, but I did make a glorious mess in the kitchen. YAY! :O) Thank you, Mr. Possum for your generous donation of oil. I also found two frames with mats I kept to use for some Walter Anderson greeting cards I planned to hand color with Little Possum. This is a project that should take me less than thirty minutes even with her involvement, but I just couldn't seem to get motivated in that direction. It's just watercolor pencils and water for Pete's sake! There they sit. In the pile. There's an envelope I brought upstairs with a recipe I was going to blog. When I can't craft, I often turn to the kitchen for release. I told you, ebb and flow. It cycles. Now, note the glue gun and the magazine on the stair rail. Yep. I was going to zone out and roll magazines for a recycling project. Also a NO-GO. Wow,  really? I feel like an attempted craft murderer at this point.
Get it? Attempted murder? Murder of Crows? They say these are Ravens, but whatever? It's funny. It took me a minute when I first saw it with the caption. LAUGH, DANG IT! NEVAHMO, SAID THE CROW!

So what is the DEAL??? Four days of this bizarro inability to build. I keep walking around looking for my "missing piece" I keep thinking. I really need to go to a garage sale or a thrift store, I need SOMETHING. I am missing a THING, but then I woke up today and realized, I'm not. I bought a fish yesterday. We got a great deal from a friend who was moving. We haven't had a fish in forever, so really, that should help, but it didn't fix any magic thing. Yes, I love our "new" old fish, Toad, but he wasn't the missing piece and neither would be any old new thing I could find at a yard sale. It's not that. I am missing PEOPLE who are important to me.

I posted a while back about learning from my two moms how to make do with what I had, and that I wasn't treated as a "broken" step child. I was never one of those kids who fantasized about my "real" mom and my "real" dad getting back together in some Haley Mills "Parent Trap" happy ending kind of way. That never really crossed my mind. I don't know why. I just NEVER pictured them together. It probably had something to do with the fact that I had siblings in both families. What I wanted more than anything in the world was to have all my siblings in the same place at once. That was my Brady Bunch happy ending. I HATED leaving one house to go to the other. It felt like abandoning my own children when I had to leave behind my sister or my brothers. I always wanted to grow up and have all of them come live with me.

Of course that never happened, because they grew up, too and they have families of their own. ;)  Which brings us to today's emotional log jam...and the layers of the ogre onion.  Some of the extended family don't quite get along. They haven't for a while. So my peaceful Utopian dreams of all us "kids" living happily ever after were shattered. And by shattered, I mean drop kicked, dragged on the ground, lit on fire, thrown off a building, swept back into a pile and packed into a cannon and fired over a sea of hungry sharks, shattered. Being the wonderful big sister naive interfering idiot that I am, instead of keeping my mouth shut and continuing to hear the barrage of  "I can't believe this, can you believe what they did to me" phone calls, I said, hey, you know... let's get this out in the open, let's be adults let's work this out let's get this over with and MOVE on. Families fight, but then they move on. VERY LONG story short...that ain't what happened. Now they don't speak to me. Now my brother is deployed and I miss him. AND THIS WASN'T EVEN MY FIGHT! I just said enough of the bickering I don't want to hear it anymore! Well, I don't, but I don't hear anything else, either. So, my something beautiful I will create this week is a letter to all of them. It will tell them about this blog, and how much I miss them all, and how much this affects us all.  Then maybe I can clean up some of my other messes.

I mean this really does look like craft barf.
And this is for those of you who think my house always looks perfect. It looks like that, because I only choose the best pictures to post on Facebook or Pinterest or the blog. Don't judge me, everyone does it. It's called marketing. ;) Remember that when you're at home judging yourself against Sally Sue's perfect Facebook  lie life.  One day, I'll post a blog with crafting fails, so you can see how many times I screw up before I post something awesome. <---Yeah, I just said that. I'm awesome. See, I've therapeed myself.  Now, You go "say youself you love you" and make something beautiful today.  And like Toad the kitchen fish says....

"Just keep swimming"...Oh okay, he stole that line from another famous movie fish, but he's not "creative" like his new family, but we love his spirit. Really, his heart is in the right place and what he means is that you have to learn how to ride those waves of ups and downs. That's what life is all about. Thank you, kitchen fish, you are so Zen.


Monday, April 16, 2012

PINspiration! Playing Dress Up

So I've had this mirror from Wal-Mart for a while now. Big shout out to Wally World for getting us all the stuff we "need" on the cheap, but by golly this thing is UGLY. I have moved it all over my bedroom, trying to find a balance between convenience of use and not having to look at the dumb thing. I've even had to stack it on top of stuff to be able to see all of myself in it. I get tired of looking at a headless pear, you know? Anyway, Pinterest to the rescue. Someone, actually many someones have pinned this little project from Shanty to Chic. It is SUPER simple it just takes a little time to wait for glue and paint to dry.
My finished project
I followed the tutorial found at Shanty to Chic
I made a couple of minor changes because of product availability and personal preference. 
My 6' fence boards are cedar and wider than the ones used on the blog.
 I bought four instead of five (2.39ea).
I did use gorilla glue to attach the mirror.  As always with GG it's going to puff out of the sides if you get too close to the edges. I always stay about 1 inch inside my border. Watch for it to puff out, and you can wipe it off while it is still wet. Note the placement off the floor. I did this because I previously had my mirror stacked on top of something else to make it taller. If you are going to do this, don't trim your 6' boards. The blog mirror is about 5 feet tall. I kept mine 6 feet.  
My wood accent at the top (larger size than the tutorial 10.99) is attached with wood glue and then air nailed in. I know most people don't have an air nailer, but if you wood glue it, you can always clamp it until it's dry. I don't trust hot glue in the temperature extremes we have. ;) 
I also spray painted instead of brushing on acrylic paint. The cedar boards don't soak in an even coat of the paint, so they stay rustic looking. My base color was a matte finish cream by Rust-O-leum(4.39). I brushed on and rubbed off Martha Stewart Home metallic glaze (5.50). The color is Muscovado. 
I bought all these materials at Home Depot. Yeah, I'm $30.00 in on a $5.00 mirror, but really have you priced mirrors? Especially in Alaska. I've already used the two paints for another project, so really I didn't spend ALL that money on this thing. Plus, if I decide I hate the way it looks later, I can always shove it in the closet to keep bugs out. Cedar. 
There's your PINspired Project for today! 

What are YOU pinning?


Thursday, April 12, 2012

PINspiration! Mixed Medium Smash Up

In all my pinning frenzy, I have pinned my own projects hoping to generate a bit of traffic to my own website. Yes, like everyone else, I participate in some shameless self promotion. It does a body good. I like when people like me. Imagine my glee when someone actually repinned my funky little picture to a really awesome board. I mean, I go there looking at all these things this pinner has pinned. (by the way, I'm thinking of making a new drinking game where you take a drink every time I use the word pin. PIN PIN PIN PIN. Yay! Crafting is fun!) Anyway, there's some really beautiful stuff, and wow, I made it on this board, too. COOL! I know I sound like a complete amateur, but to me that is a complement. I loved so many of the pins on this board, I stopped in the middle of re-arranging four rooms at the same time to sit down and craft. That was logical, I know. It needed to be done. Anyway, I have a few links to what Pinspired me, and then what I made, and how I did it.

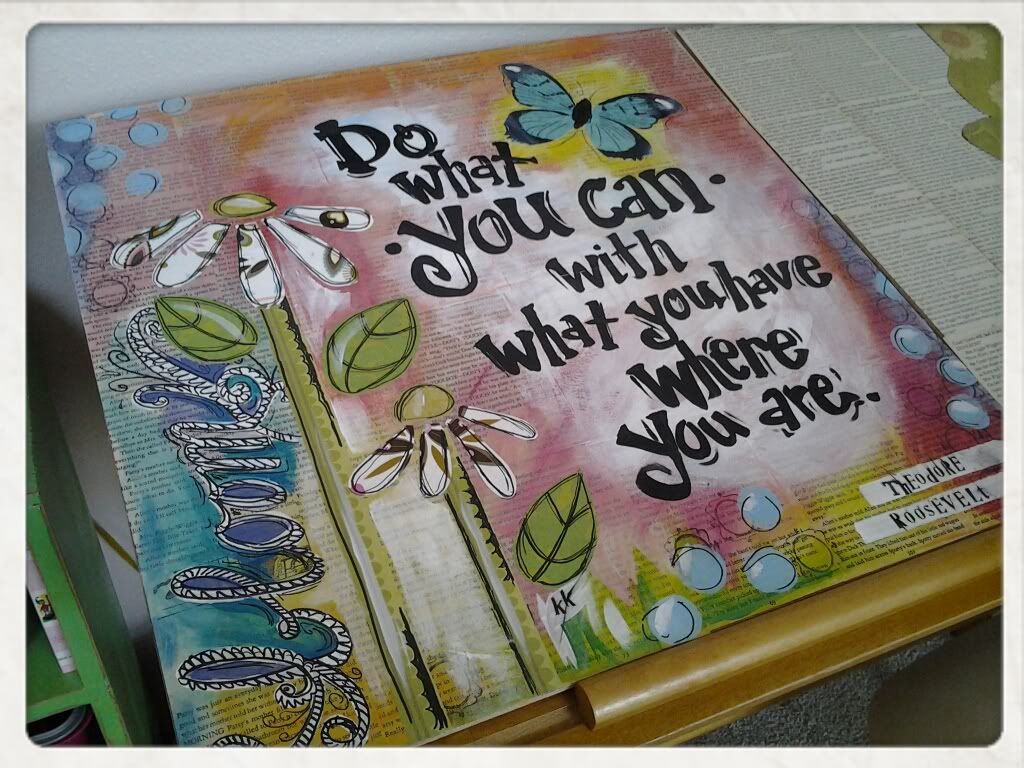
First up. This quote. Love it. It's kind of my creating philosophy. I was asked about where I learned to do the things I do. I think more than anything, I learned to do or make things because growing up, we didn't have the money to buy them. My mother and step-mother, who are both called my mother (I was never called a STEP child, that means hurt or broken, and I wasn't treated as such.) are both fantastically  imaginative and inventive in their use of funds and materials. They didn't get to go buy all new stuff to redecorate a room just because a season changed, but they wanted their homes to stay on trend and beautiful. They BOTH have very differing styles, but are so amazing at what they can make out of practically nothing. I give them credit for my alchemic skills in turning garbage into greatness. I have been dumpster diving so many times, it's not funny. I look at refuse piles on the side of the road and get excited when I see pieces of furniture poking out. I think I will ALWAYS drive a truck. I'm just sayin'. Do what you can with what you have where you are. ~Theodore Roosevelt.
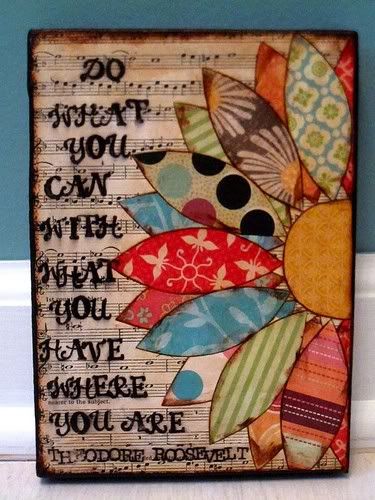
photo from Pinterest, art by Pitter Patter Art

This cute picture of it came from Pinterest. It is no longer available for sale, but she has some other cute pieces with inspirational quotes. Check out Pitter Patter Art. 

Boy...the day I find old sheet music for sale...for now old paper backs will have to do. I like getting mine from the thrift store on post. It supports our ASYMCA. They do lots of projects to take care of soldiers and families.

This cool board has the paperback page backing. Love the tree, too. I'm thinking of something for this tree. You might see it later. Unfortunately, I could not find the original artist of this piece. If you know who it is, please tell me. (nicely)
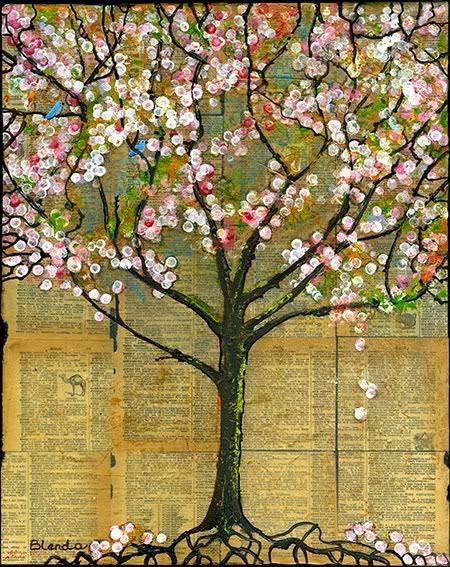
photo from Pinterest artist unknown


I love the bloom on here. Well, I love all the colors and the message, but specifically for this project, the word bloom...
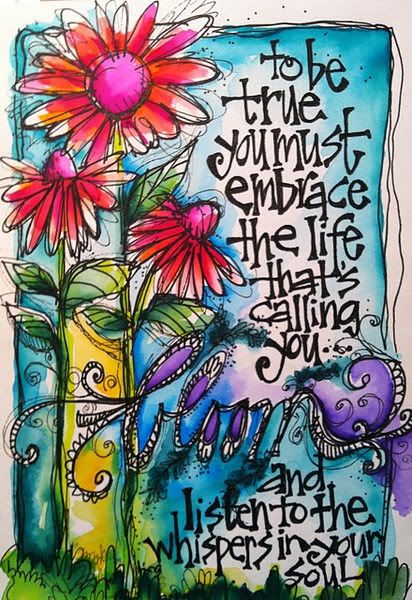
photo from Pinterest artist Joanne Z. Sharpe
AND HOLY CRACKERS, y'all! She teaches how to letter like this!! For $35 you get 29 lessons and unlimited access! That's VERY reasonable in my book. I'm going to invest in myself and buy in. If you are a journaler or you just want to write something cutesie, you can do this! I think this work is incredible. 
It's called WHIMspirations. 

And finally, one more piece went into this Pinspired Project. 
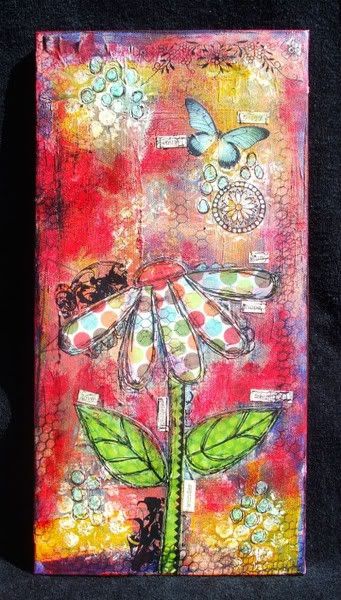
photo from Pinterest art by Love is in the Details
 This one goes back to another blog called Love is In the Details.
I didn't find this piece on that site, so I hope it is really there. This resembles the work they are offering classes for, so hopefully, I'm leading you in the right direction. ;)

AND HERE IS WHAT HAPPENED!!!
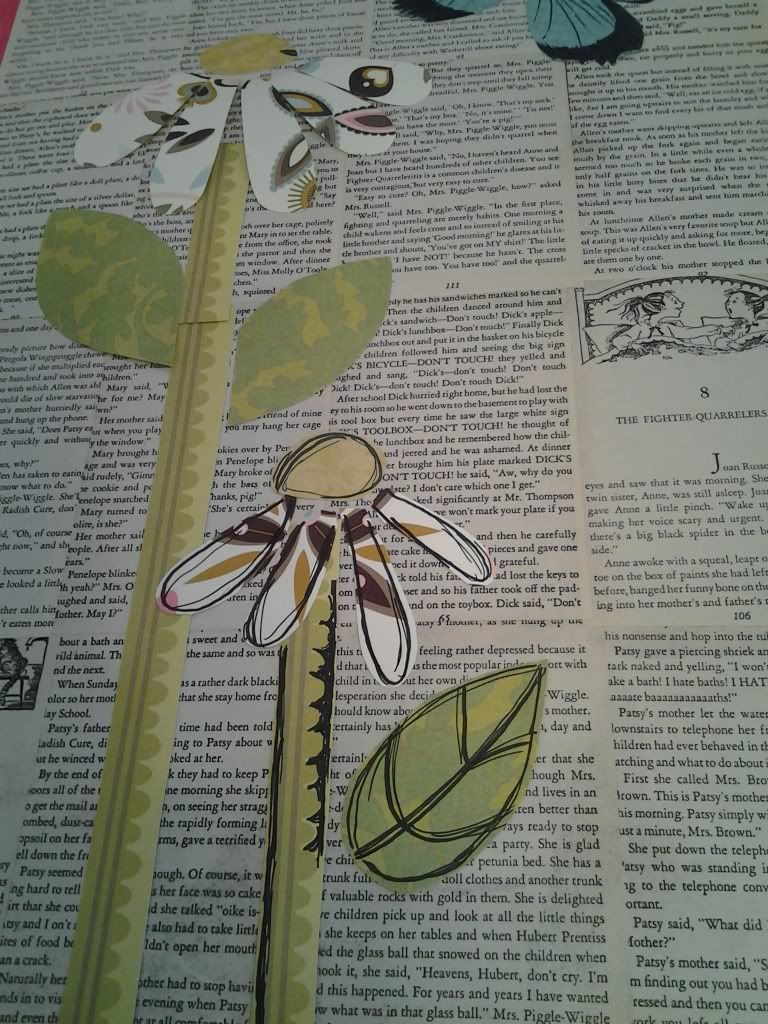
PINSPIRED PROJECT: Mixed Medium Quote Board
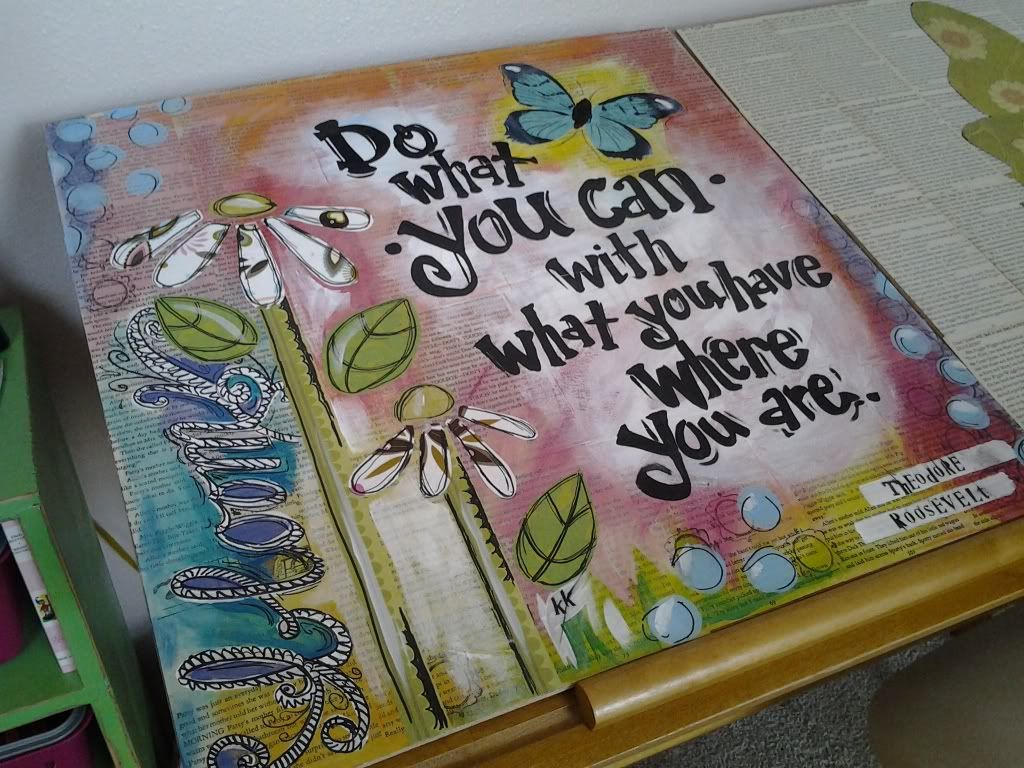
You Can, 24x24 Mixed Medium, Paper, Acrylic, Ink, & ModPodge on wood.
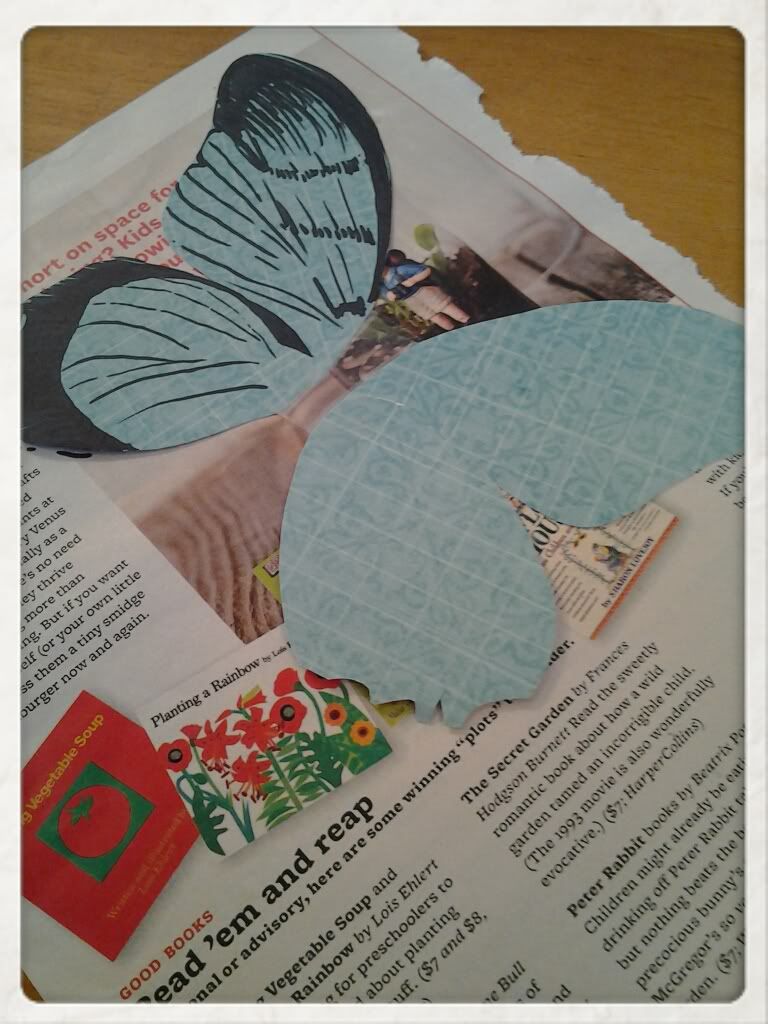

Step 1:
Base Layer
ModPodge the underside of the book pages only. If you MP the tops, the paint doesn't stick well.
I used a paper cutter to trim the edges off my pages, too. You don't really want big white "gutters" from the margins. It will make a really distracting grid. 
Step 2: 
Paper Details
I used patterned scrapbooking paper to make my flowers and butterfly. You could always paint these on or use stickers (use what you have), but the whole point of this mixed media stuff is to add interest through different layers and different textures.  Below, are some of the parts cut out, and I'm beginning to place them on the board. Once they are in place, I make small marks with a sharpie where they are because I'm going to take them all off and paint the back ground. The sharpie marks make it easier to put them back where I wanted them to go in the first place. 
 Step 3:
Detailing the Details
You might also notice the flower on the right has black lines. This sketchy look is achieved by first outlining a few millimeters from the edge with a regular sharpie that has been worn down. Not quite fine tip. Then use a sharp sharpie and kind of sketch around those fat lines. The lines add dimension to your flat pieces and the sketchiness makes them less static. 
You can also add details like this butterfly.
If you don't know where to draw lines on a butterfly, google it. I promise you will find SOMETHING you can use. If you are afraid, do it in pencil first. If you mess it up...it's just paper. Try again. 
Step 4:
The Background

It really is just a bunch of watered down acrylic smeared all around. I live in Alaska, and I keep forgetting how arid it is here. I should have used blending gel or floating medium to get better blends, but it is what it is. and I'm not upset about it. It's still cute. I also added the word bloom with white paint and I stamped with ink to add another layer of texture. You can use anything to make texture like this. I happened to have a stamp I liked, but a rolled up rubber band, or a piece of metal fencing, or a piece of bubble wrap can all make texture. Use what you have where you are. The paint is watered down so we can still see the words on the pages remember. What is the point of a layer if you can't see it?

Step 5:
Glue the Paper Details
Use your modpodge and glue the paper details to the board. Try not to get modpodge where you will have to write with sharpie (the word bloom). It just works better to write directly on the paint.
Fill in any lettering or other details. I put some little curlicues around my flowers. 

Step 6:
White out and Lettering
Use blending gel and white paint to cloud out a spot for your quote. This will help it stand apart from the rest of the back ground. Pencil in your quote and paint, sharpie, or paint pen it on. Whatever works best for you. I typically letter with a flat paintbrush, but my second choice is Sharpie enamel paint markers. The paintbrush is faster for me, but everyone is different.  Theodore Roosevelt is stamped on with a couple different fonts of rubber stamps. 

Step 7:
Mod Podge the Whole Doohickey
Yep. As soon as all of your elements are dry, put your top layer of Mod-Podge on. You are sealing everything together in one layer. Any of your paper pieces that were trying to peel up will be stuck down now, and the whole thing will dry to a glossy sheen.

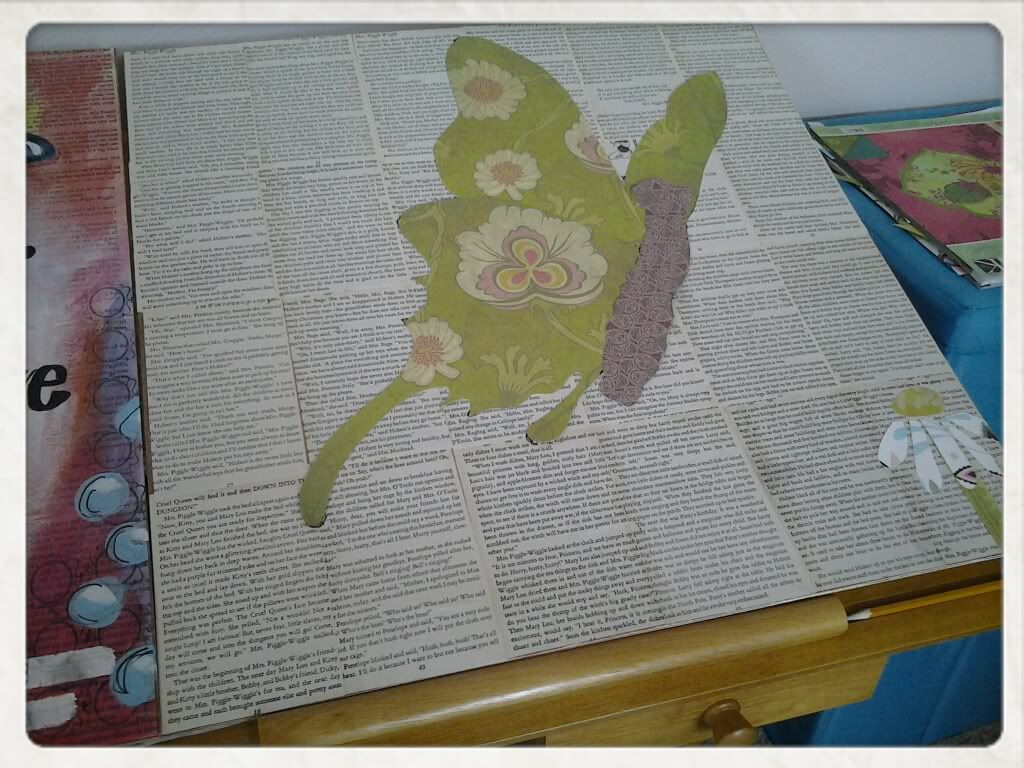
That's my take on a few Pinspiring pieces. This guy is next. :)

Happy Pinning and Happy Crafting! Leave me a comment and let me know what Pinspires you, or find my Request Board on Pinterest where you could Pinspire my next project!!


PINspiration! The Easter Board

There's no way around it, no doubt about it, stick a fork in me I am totally done, one hundred and ten percent addicted to Pinterest.  If you have been under a mossy rock somewhere and you don't know what that is, just go on over and get yourself an invite and sign up for the world's best electronic bulletin board EVER. I keep saying I'm not a hoarder, but in all reality, I probably do have a tendency. Pinterest, you are an enabler. I can "keep" all these wonderful projects and tidbits of information in a VISUAL, electronic filing cabinet.  It's eye candy, and craft-porn, and over stimulation all in one handy dandy little box on my desktop...or laptop...or tablet...or smart phone. Ah, but enough of my ode to Pinterest. The short of it is this, we pin and pin and pin and save so many recipes and craft projects, and I spend a good amount of time wondering if I will EVER get to actually USE my pins and make some of these things I see and I wonder if I'm just window crafting. That's like window shopping, but just looking at craft projects saying, "someday." NOOOOOOO!!!  To avoid this, I made myself a goal. 

Make something beautiful EVERY day. 

 I may or may not have actually accomplished this goal, but it has been fun to try. My somethings beautiful are also open for interpretation. For example, inspired by Pinterest, I made a beautiful Chicken Tamale Pie. I made a couple of minor changes, but for the most part, I got a great recipe the fam loved and it was so easy to do. Just because I sat here clicking through what my friends were looking at. Anyway, I really got nuts for Easter and pinned a whole board for the holiday. I will have a board for all the holidays. I found things to do, and then forgot half of them by the time it rolled around, and just think how upset I would have been when I saw someone else post their deviled eggs that look like hatching chicks on facebook if I forgot to do mine!! Grrr. Thank you, beautiful filing cabinet! Shiny ADD, enabler Pinterest, again I say, I love you! So here are the projects I DID remember for Easter. I have included links to the original blogs where they exist. Some pins on the almighty Pinterest are just pictures. When possible, I back track to find the original tutorial so credit can be given where it is due. (In fact, if you see a project on here that you KNOW there is an uncredited source for, feel free to leave a NICELY WORDED comment and a link if possible, and I will check it out and try make the hook up. If you aren't nice about it, I will just delete your comment and pretend you don't exist...call me Cleopatra if you will. Rule #1 at PP: Be nice or leave.)  


Pinspired Project #1: Krispie Carrots
My version looks VERY different from the ones you will see in this tutorial. Hers are much easier to do!! I didn't want to go to the commissary for pre-made treats, so we made them at home. Next time I make these, especially if I do them in bulk, I WILL get the pre-made because I don't like forming these by hand. Just sayin'. Although, they were incredibly tasty. I had no idea that the vanilla flavored candy melts would be so complimentary to Rice Krispie Treats. WowSA! Tutorial is here at The Celebration Shoppe.

Pinspired Project #2:Strawberry Carrots
Hey, while we've got the candy melts out...Make sure your strawberries are washed and COMPLETELY dry. Wilton candy melts don't like to have water added.  Follow the directions on the bag for melting. This one only had a photo on Pinterest. It didn't link back to a blog, but I googled, and this is a blog I found with some other cute dipping ideas with different colors.   Visit Ms. Flour Girl for a good how-to.

Pinspired Project #3:  The Hatching Chick Deviled Eggs
These guys crack me up! Pun intended. I found no step by step for this one other than a video from Rachael Rae, which I didn't watch because it took too long to open. I have a few tips of my own. First, bring your patience. Peeling these is a trick, because you don't really get to hide the ugly side on the bottom of the platter. Once you have your WHOLE eggs peeled, you're gonna slice the caps off. I did this at about two-thirds of the way up. NOTE: You don't always hit the egg yolk at this point, and you have to get creative and dig around a bit with a spoon. I found a grapefruit spoon worked well. After you have separated all the yolks, you can whip up your filling. (Everyone has their own recipe, ours is mayo, mustard, relish, a little salt to taste, mixed til creamy) Do yourself a favor and fill these with a pastry or icing bag. Some of the little caps were too heavy so I had to slice a bit off and position them carefully. Eyes are olive pieces and beaks are carrots. Don't be afraid to play with your food until you get what you like. :o)

Pinspired Project #4: The Bunny Cake

Excuse me, Garcon, there is a hare in my cake...OH I LOVE THIS GUY!  So there was a pin floating around where this photo had been posted on a cake photo website giving NO credit to the original poster and giving us Pinheads no link back to the tutorial for it. The tips on this REALLY helped me out, people! Be sure to link properly when you pin. It helps us all. I kick myself in the butt all the time when I go back to get a pin and finally "do it" and there's nothing behind my link. Just a photo. Well, Hell's Bells, now I am in project mode and I have to stop and google again. Anyway, click on over here to Sillybees Chickadees and learn how to make this awesome fluffster.  Follow the advice about ONE drop of food coloring. It's true. Also, the ear carving is perfect.

Pinspired Project #5: The Egg Banner
I love recycling! This project should actually be on the recycle remix category, but it's not an original, so I'll give credit where credit is due. :)  This cute idea got folded and put away for next Easter, too. I made three of them, for all my large downstairs windows. These are so on the cheap and can be done with the kids. I plan to make some banners for other stuff too. Birthdays, July 4th...Halloween. The tutorial found at CreationsbyKara even has a free printable pattern for the book pages. 

Pinspired Project #6: PEEP-tini Cocktails

After all that crafting, YES I want a drink. So I tried the original recipe found at Feast of Fun.
I do love the idea, but I am NOT a big milk drinker, if you are give this one a try.
It calls for milk, and honestly while it may look cute in the glass,  to me it looks like Pepto-Bismol and tastes like cherry cough syrup. We scratched that and tried again. It's what we call, Back up and Punt. I'm not about to let these adorable glasses OR cherry vodka go to waste. Good thing we keep a well stocked bar. 

Our new recipe: (2 cocktails)
3 oz cherry vodka
1 oz triple sec
dash grenadine
5 oz ruby red grapefruit juice
3 oz club soda
splash of lime

Shake over ice and serve, and yes I DO realize that shaking club soda can be messy. I am such a child I will opt for a fruity, fizzy base layer in my drink any day of the week.  The refreshment is worth the mess. You can just roll it around in your shaker if you want. Don't be too vigorous. 

And there you have it, an adorable,  Pinspired Easter.  Don't just hoard your pins, try them!